Monday, 17 October 2016

Halloween Projects

Halloween is coming so here is some art and craft project. There will be more coming. Make sure you check out Happy Kid's Corner facebook group 


What you will need. 
Orange paint (if you don't have orange paint mix red and yellow together) 
Green paint 

Apple 
Paper 
Paint Brush 
Black paint or paper

Cut the apple in half 
dip it in the orange paint 
stamp it on the paper
to add the leaf and stem
Add eyes with either black paint or black paper


🎃🎃 Puffy Ghosts 
White Cardstock paper
Scissors
Glue
Cotton Balls

Black paper

Start by cutting out a ghost shape out. Cover the shape with cotton balls, and cut out eye shapes or googly eyes,cut out mouth shape and glue them on to the ghost.


Frankenstein Toilet Roll 
- paint it green
- add hair
- glue on googly eyes
- add stitches
- add mouth
- glue on grey beads on the side

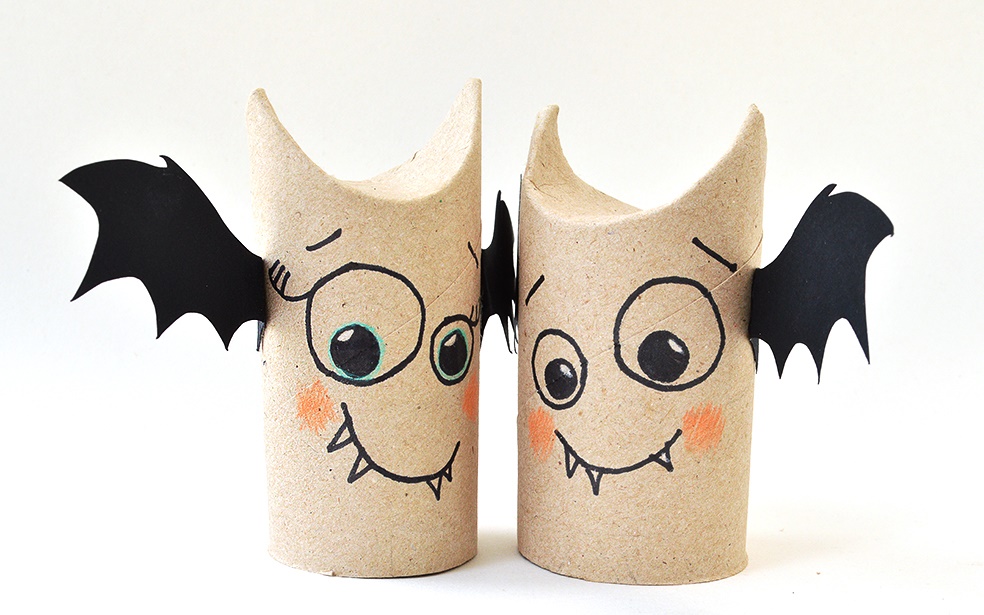
TOILET ROLL BAT BUDDIES
Fold in the top of the toilet roll to create the bat ears, glue the fold into position (use kitchen paper tubes if you prefer)
Cut the wings out of black craft paper and glue to the sides of the TP roll
Draw on the goofy facial features

Toilet Roll mummy 
Wrap the tube in tissue leave a space for the eyes
glue on the eyes

Toilet Roll Cats 
Start by squishing down the top of the paper tube cores to create to ears.
Paint with black paint and leave aside to dry. The joy of painting toilet roll cores is that the paint soaks in and dries super fast.
When dry it’s time to watch the cats emerge…
– cut lemon shape pieces of yellow paper and draw the pupils on with black marker
– glue on the eyes
– make little holes in the cores, push in the pipe cleaners and bend to make the tail and whiskers


Halloween Paper Plate Wreath
What you need
– Paper plate or a cereal box would even work
– Finger Paints
– Halloween colored tissue paper
– Glue
– Construction Paper
– Ribbon or String for hanging
Cut out the middle of the paper plate.
The first step is the hand print spider. Pick out what colour of construction paper you’d like to use and have your child use both hands to make the hand prints on top of each other facing opposite ways to represent the spider like the one above. Once it dries you can add googly eyes or personalise it with a Halloween message but that’s totally up to you! While the hand prints dry you can work on the wreath, cut up your tissue paper into small squares and cut the middle out of your paper plate. Then scrunch the tissue paper up and start gluing it to the paper plate

Monday, 26 September 2016

CUPCAKE LINER MONSTER STICK PUPPETS

HOW TO MAKE CUPCAKE LINER MONSTER STICK PUPPETS
Supplies you will need:
Directions:
1. Start by flattening your cupcake liner and glue it onto a piece of card stock paper to give it more weight. Cut out the cupcake liner.
2. Cut out a mouth, arms, legs, horns and teeth from your construction paper and glue them onto your cupcake liner. Also, glue googly eyes onto your puppet.
3. Add some tacky glue to the top of your jumbo craft stick and glue your cupcake liner onto it. Once it has dried completely you can have fun putting on a puppet show with your monster puppets.


Saturday, 24 September 2016

Passion fruit scented playdough

Passion fruit scented playdough
This is a passion fruit scented playdough that children will love playing with. Non edible, but lots of fun and great for sensory development
Ingredients
2 cups plain flour
1 cup salt
2 tbsp oil
4 tbsp cream of tartar
2 cups boiling water
2 or 3 passion fruit infused teabags
6 drops of yellow food colouring

Instructions
Begin by mixing all dry ingredients together in a large bowl
Infuse passion fruit tea bags in boiling water and set aside for 1 minute
Combine all wet ingredients with dry ingredients and knead dough well
Notes
Not edible
Supervision required at all times


Benefits of play dough
Putting some play dough on a table and children seem to come running. It’s so much fun and there are also many benefits to getting your children to play with it. Here are just a few – 
  • Open ended and comes without rules
  • Sensory development 
  • Fine motor skills are strengthened through playing with play dough
  • Creativity and imagination 
  • Enhance social interactions as children play with it together
  • Cooking skills achieved when involved in the making process

  • and more!


Friday, 16 September 2016

Button Snail

Button Snail

Materials Needed:
  • Buttons
  • CD
  • Card stock Paper
  • Glue
  • Pipe Cleaner
  • Googly Eyes
  • Black Marker
Directions: 
To start you’re going to cut out a shape for your snail out of card stock paper. Make sure to make it big enough to leave some room so that you can glue it to your cd.

If you don’t have an old cd to reuse for this craft you can use a piece of cardboard, just cut it into a circle big enough for the snails shell. 

https://www.facebook.com/groups/1671003259816984/

Friday, 2 September 2016

Rice Art

Rice Art 

There are so many different ways to colour rice out there that require alcohol or vinegar to ‘set’ the colour but I have found that I have never really needed to this and skip this part completely.

It is so easy to make and you can use coloured rice for all kinds of sensory activities, art and crafts.

WHAT YOU WILL NEED?

1 cup dried rice. (I use jasmine rice because I love the smell!)
1 teaspoon food colouring (I have also used diluted paint before with the same outcome.)
Paper towels
Tray or plate (this for drying the rice)
A container with a screw on lid on.


  • Add food colouring to the container and pour in one cup of rice.
  • Screw on the lid and shake, shake, shake until the rice is completely covered.
  • Add a little more food colouring if needed to achieve desired colour.
  • Place the wet rice our onto a paper towel and plate.
  • Using a spoon spread the wet rice out evenly to dry out. If it is a sunny day, I place the wet rice out in the sun to air dry.
  • Give the container a wipe and a rinse, and proceed with your next colour!
  • When the rice is dry, gently rub the rice between your fingers to break up any rice that may be stuck together.
  • Coloured rice will last for several years if stored correctly in an air-tight container. 

Then create picture with the rice.. The list is endless. I will post more ideas on what you can do with the colouring rice. Enjoy


Colouring in Benefits

Hi everyone, 
Art is a good way to relax, express creativity. Everyone can draw etc. There benefits for colouring in. I love it because if I have a sore head or just wanting to relax I colouring. I have been drawing, which I will make into line art for you all soon. 

Here are the benefits 
1- Colouring helps a child practice holding a writing tool the correct way and aids in developing those tiny muscles in their hands, fingers, and wrist. 
2- Colouring aids in hand-eye coordination as the child learns to colour within the specified area.
3- Children develop the skill of patience and learn to focus on details when colouring. Such a sense of accomplishment is achieved when a colouring page is completed. 
4- Colouring allows a child to relax and be comfortable while creating a piece of art. Children can fill in the figures and shapes on the page any way they choose, whereas drawing can sometimes be a little intimidating that the outcome won't be exactly as they wanted. 
5- Colouring a simple printed page helps a child to recognise colour, hue, line, perspective, shape and form. It also helps a child to see and recognise patterns - a pre-reading and pre-math skill. 
6- Eventually a child can even learn to plan as they decide the colours they will use in their picture and then what order they are going to colour things within the picture.
7- Last, but not least, colouring can allow you and your child to have some quality quiet time together.  It can provide a wonderful time to sit and chat with your child. 

So grab some colouring in pencils, crayons, paints etc and some sheets from Happy Kid's Corner or even draw some.. And ENJOY!!
https://www.facebook.com/groups/1671003259816984/